Products are the building blocks of PackAssist. It is the major component of a package and the rest of the components are configured around the product. Products added using PackAssist can be accessed by the user through the operator screen.After creation, the product group is added to a concept while the specific product will be added at the time of packaging. Being the major component, products when combined with packaging materials and destination offer multiple packaging solutions.
For more information Click Here
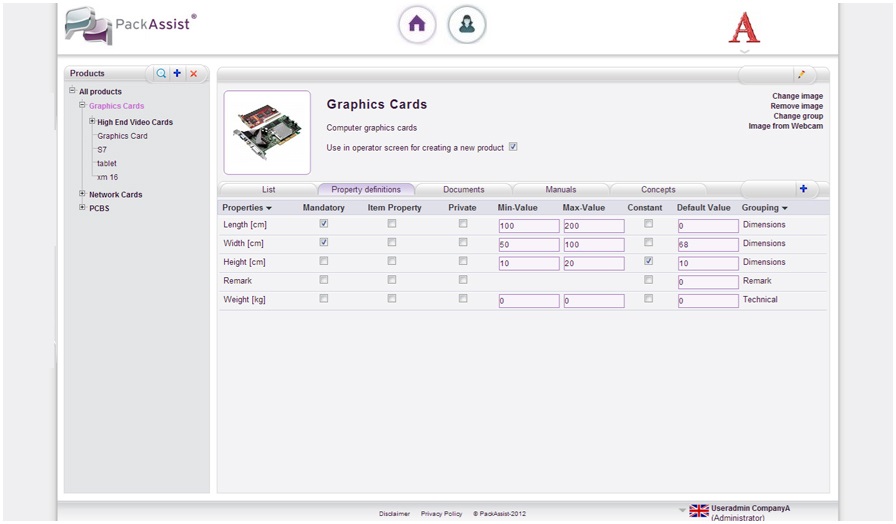
Products created using PackAssist will be displayed in the Products section. Products are classified into parent categories and subcategories. Product groups and Products have unique property definitions. Documents and Manuals can be attached to Products. Concepts which have been attached will be displayed in the Concept tab. The order of the product groups are directly involved in the available packaging with reference to concepts. If one product group is selected in the concept, the user can only choose products from that particular group during packaging. In case a product is unavailable in PackAssist, the user can provide the privilege of creating a product from the operator screen.
Image Specifications
Once a product / packaging material / destination / question option is added; a 'Change Image' link in each module allows the user to upload a new image. There aren't any size limitations as PackAssist automatically resizes the image to fit the image window. Images are only scaled down and not scaled up. The accepted image formats are jpg, jpeg, png, gif. For an image of unsupported format the following warning message will appear; "Invalid file extension. Allowed formats are jpg, jpeg, png, gif."
User Tip :
Use an image of a single product for individual Product display picture.
Products can be classified into groups for simplification. Each product group will contain an array of sub products. Products within each group must satisfy the Property Definitions of the Product Group. Documents and Manuals can be attached to a product group. Concepts which have been attached to the individual products will be displayed in the Concept section of the Product Group. A product group can be added/deleted/edited only by a user with administrator privileges.
User Tip :
Use an image of multiple products as an image for a Product Group display picture.
Every Product and Product group will have Property Definitions. A Property Definition value for an individual product can only be created after creating a Property Definition for that product group. Property definitions added for the Product group will automatically be added for the individual product in the Product Group. Conditions can be provided which will affect the way property definitions are displayed in the operator screen. If it is mandatory for the property definition value to be entered from the operator screen, the user can select the mandatory button.
For more information Click Here
Documents can be attached to a single Product or a Product group. Attached documents can only be downloaded and viewed. The supported document formats are jpg, jpeg, png, gif, bmp, tif, tiff, xls, xlsx, doc,docx,rtf, txt, pdf.
Manuals which have been created can be attached to a single product or product group. Attached manuals contain the steps stored inside and the user can view the manual details upon selection.
In Operator Screen
In order to view the manual assigned to a product in the Operator screen, the user can choose from four different options. These determine the position where the manual will appear in the packaging flow displayed on the Operator screen. The options available are;
Don\'t show The manual assigned will not be shown in the operator screen.
Show at end The manual will be shown at the end of the packaging flow.
Show at beginning The manual will be shown at the beginning of the packaging flow.
Show as general A maximum of 8 manuals can be shown as general in the operator screen.
Image from webcam : Image from webcam :
Images can be taken using the webcam and uploaded as the display picture for products and products group. This feature can be toggled on/off from the Settings screen. If toggled to 'off', then the option of uploading an image using a webcam will not be displayed. For more details please check the Settings module.
For more on Webcam Click Here
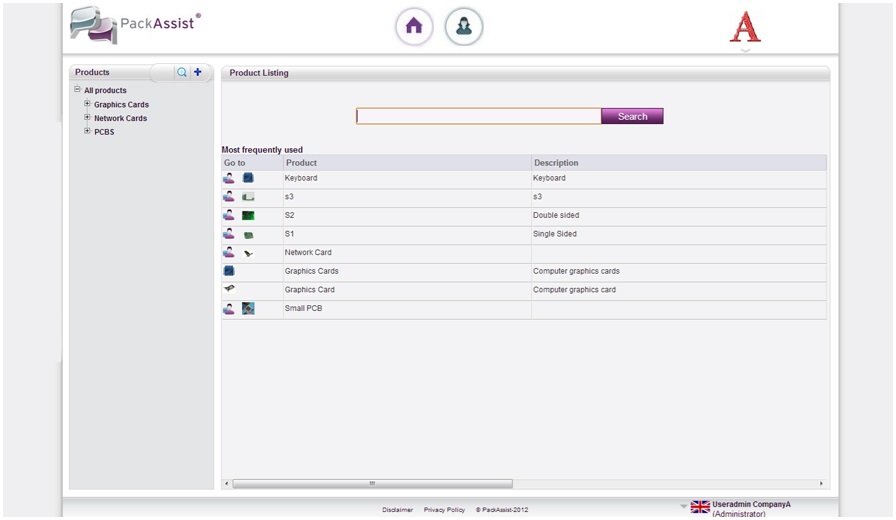
This is the main Page of Products screen. Products stored will be displayed as a list and a search tab is provided to search for products. Selecting the product listed in the list will take the user to the product details screen. A list of all the product groups and sub products can be accessed from the list displayed on the left column. Product groups can also be created from this screen.
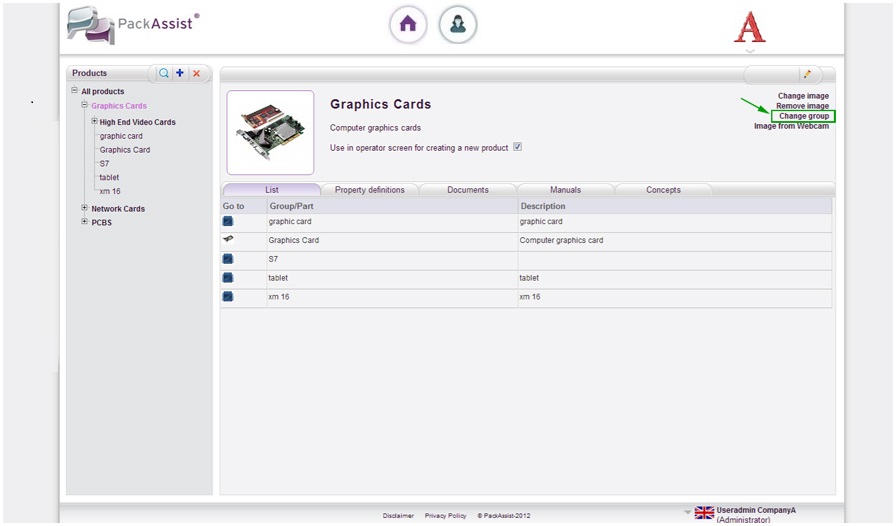
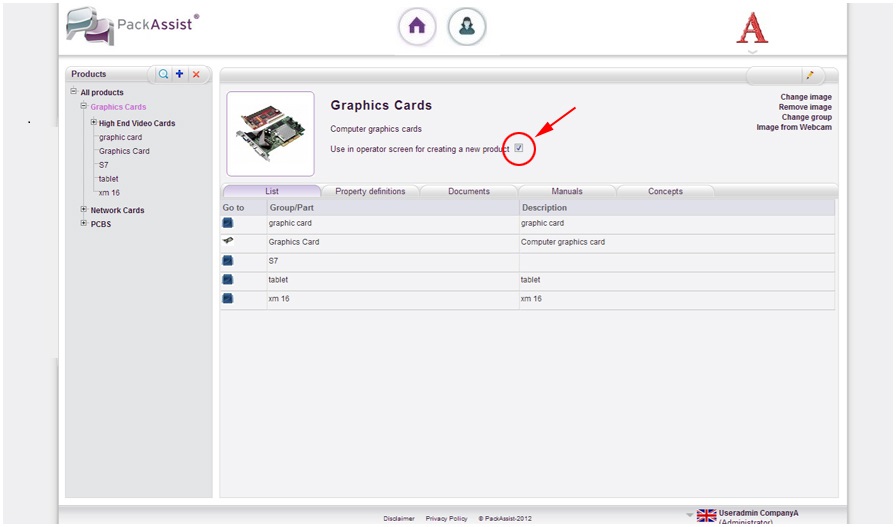
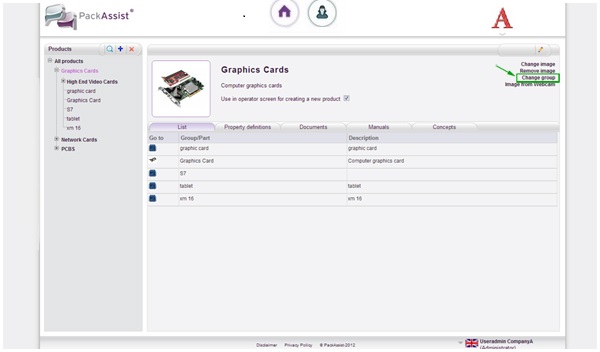
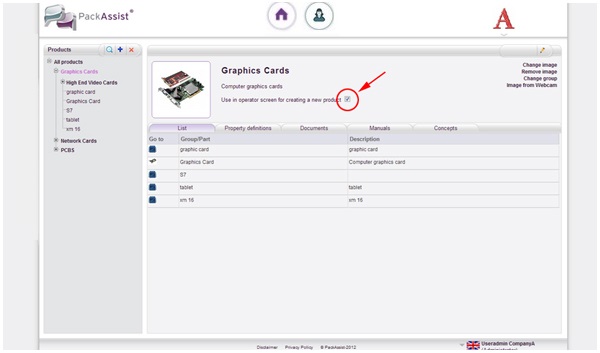
Product Group screen displays the Product group and its details. The user can edit/view product group details from this screen. A product can also be created inside a Product group. The user is provided the option to display the product group as a template in the operator screen while creating a new product. By checking the "Use in operator screen for creating a new product", product groups will be added to the operator screen while creating a new product. The Assign Packaging in the settings will allow the operator to assign / select a packaging provided the options chosen are Yes, Known or Yes, Unknown. If the option selected is "No", then the operator will not be able to assign a packaging.
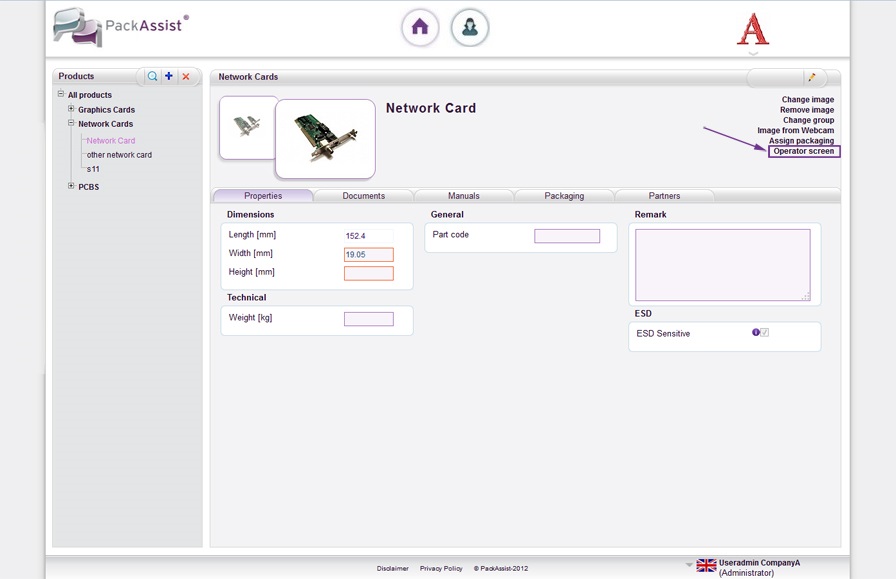
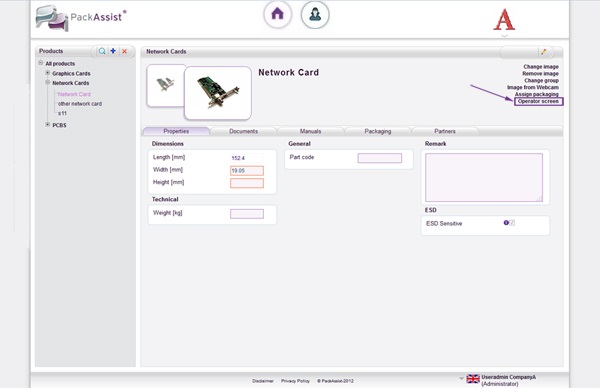
Product screen will display an individual product and its details. The user can edit/view product details from this screen. A packaging can also be assigned to a product from this page. By selecting 'Assign Packaging', the user will be directed to a page where you can select the packaging and the destination. This selection is based on best FIT criteria where an alogirthm automatically calculates the best packaging for the product. The number of limits for best FIT can be edited from the Settings screen. After this step you can save and store your package for that product.
How do I perform a Product search? 

A product search can be performed either by selecting the  or the search tab provided on the products homepage. A search can be based on Product Name, Product Description and Property Definition. Products satisfying the search criteria will be listed as results.
Click here to watch video
Can I preview the product operator screen from the products page?
Yes. You can view the product operator screen by selecting the 'Operator Screen' in the individual product page. A user can also achieve this by selecting the Operator Screen Link after performing a product search
How do I create/delete a product/product group?
Can I edit a product/product group?
Yes. You can edit the name and description of the Product/Product Group by clicking on the  icon provided at the top right corner. An option to replace/remove the Product/Product group image is also provided. You can upload an image either through the file uploader or through a webcam. (Refer questions below for detailed explanation on editing Property Definition of a Product/Product Group
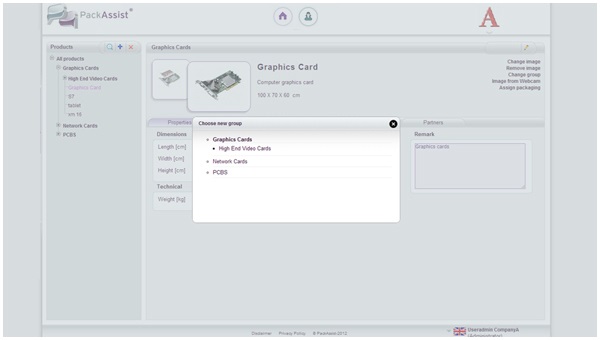
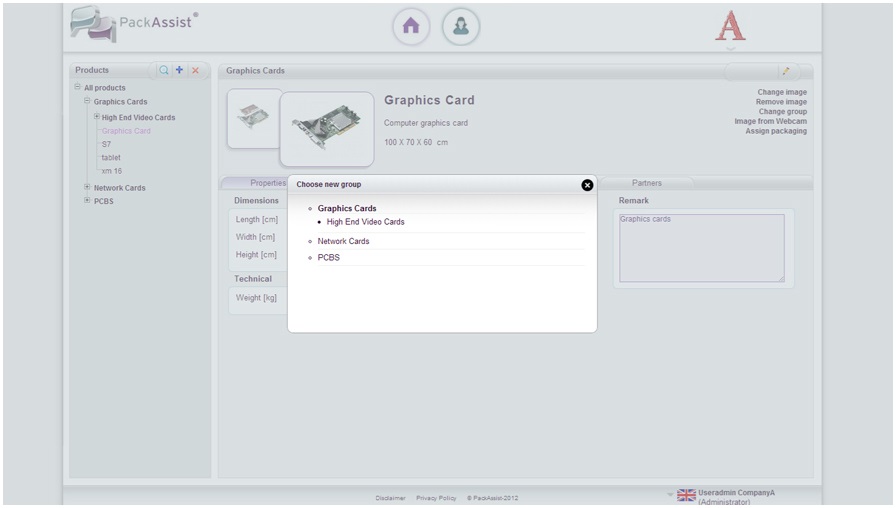
How do I change group for a product/product group?
You can click on Change Group link to transfer a Product from one Group to another Group. The transferred product will acquire the Property Definition of the new group. Note that products with packaging cannot be transferred. Clicking on Change Group link in a Product Group page allows you to transform the selected group into a sub group. This transfers the whole group and its entire products to a new group. In this case the Property Definition will be unaffected.
Can multiple products be displayed in the operator screen while creating a new product?
Yes. By checking the 'Use in operator screen for creating a new product', products will be added to the operator screen while creating a new product. Please note that creation of the product in this case will be done from the operator screen.
How do I add documents/manuals to a product/product group?
Documents and Manuals can be attached to existing Products/Product Groups. Click on the  to upload a document/manual under the documents/manuals tab. The supported document formats are jpg, jpeg, png, gif,bmp, tif, tiff, xls, xlsx, doc,docx,rtf, txt, pdf. Please note that manuals have to be created before attaching them to a product.
Is it possible for me to tag a concept to a product group?
Yes. An already created concept can be attached to a product group. Under the Concepts tab, click on the to add a concept to the Product Group.
Can I add property definitions for a single product rather than a product group?
Property Definitions have to be defined for a Product Group. Only then will the product in the group acquire the property definition of that group. The only change you can make is in the Property value.
How do I assign packaging to a product?

Select a product from under a Product Group and then select the Assign Packaging link. Select a destination from the drop down menu in the flow. If there are no existing packaging combinations for that destination, then a message stating the same will appear. Once a destination is selected the Assign Packaging Grid will appear. The best fitting combinations are listed down based on the Packaging name & a Ranking. Rank 1 is the best possible fitting combination; Rank 2 is the next best and so on. Depending on the number set for the Best Fitting Limit in Setting module, a blue line appears to demarcate the best fitting combinations and the least fitting ones. If the Best fitting Limit is set to 3, then the blue line will appear after the third packaging combination.
For more on Best Fit & Fitting Conditions Click Here
Click here to watch video